tutorials
Here are some snippets of code that you might find useful, as well as some explanations.
autoplay music mobile compatibility mspaint on site redirecting URL's
bechnokid's freezeframe.js tutorial
autoplay music
To add autoplay music, all you have to do is use the "audio" tag! Be sure to add autoplay and loop to the tag in order to have your music play upon the page loading! You can copy and paste the below code, just be sure to replace "AUDIOSOURCEHERE" with the link to your audio!
You'll want to put this tag within your BODY tags. I place mine right after < body >
Once you have the code placed where it needs to be you'll want to replace AUDIOSOURCEHERE with the actual source to your audio! In my case, I find youtube videos of the song I want to use, use software like mediahuman, and download the file that way!
Once you have your audio file downloaded, you can either host the file on your website storage or do what I do, which is to upload the file to catbox.moe! Once it's uploaded and you replace "AUDIOSOURCEHERE" with the new audio link, your code should resemble something like this:
And... You're pretty much done!
SETTING THE VOLUME
The only other thing I could mention is a script I use to lower the volume of audio, because a lot of the audio I use is very loud and I don't want to hurt my visitors ears! I use it on this page too!
So, once you have all of the above added to your code, we can make some edits and additions :D! To start, we want to add a script that'll lower the volume of the autoplay music you add. You'll want to add this after < / style > and before < body >.
The script works with percentages too! So, for example, 0.5 or 50% both equal to half volume! You can, of course, make this lower (or louder) if you so desire. I find 0.1 / 0.2 comfortable for my listening pleasure :D
Then, you have to add two small things to the audio script we have above!
id="audio1" and onloadeddata="setHalfVolume()"
Adding the above will look like this:
This will make the audio autoplay, loop, and turn the volume down to whatever your desired amount is!
mobile compatibility
Small heads up, I actually followed this tutorial for mobile friendly CSS to understand this topic myself, however, I must have read it about 50 times before I finally understood it LOL. So if you also read it and don't know what to do like me then I hope I can help you a little by explaining my own thought process!
From my understanding, we have to use the @media tag in CSS! That means somewhere between < style > and < / style > you should add: @media. But that's not all! We also want to add some other stuff to the @media query so that it knows what it's working with! It should end up looking something like... This!
Now, basically what this means is that any screen that is smaller than 640px in width will have different CSS rules applied to it, depending on what you type within the @media query brackets! You can change this numerical value if you want, but I don't recommend it. From what I've seen this is the most commonly used value, even if I don't know why :D But it works on my mobile so!
Within the @media query brackets, you should define which parts of your CSS will look different on a screen smaller than 640px! I'll provide a few examples so that it might make a little more sense to you.
The above code is the @media query CSS I use for this page! My original CSS looks like this:
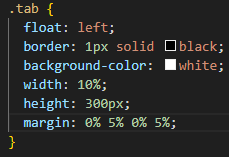
Whereas, because I want it to look different on mobile, within the @media query brackets, it looks like this:
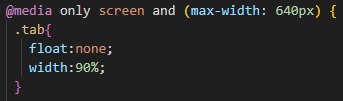
I'm declaring only the things I want to change which are the float property and the width. Everything else will stay the same as declared in the CSS unless otherwise specified!
In my experience, there shouldn't be much that you have to change. It's mostly just repositioning elements or otherwise removing them from sight on mobile. It does take a bit of trial and error, so I recommend having your phone open on the page you're editing while testing values and such to make sure it's working correctly! But to summarise:
- @media only screen and (max-width: 640px) { } has to be added to your CSS. I add mine at the very bottom, just before < / style >
- Within the @media curly brackets, you have to add new CSS for the elements of your main CSS that you want displayed differently so that your page works on mobile.
- In my experience, it mostly consists of repositioning and/or removing certain elements from view.
- Just treat @media only screen and (max-width: 640px) { } as part of your CSS. This way of thinking is what ultimately helped me understand the process.
- Have the page you're adding mobile specific CSS to open at the same time as editing so that you can see changes happening in real time!
mspaint
so, all you really have to do is head to this github and scroll down until you find the relavent info. but, if like me, you struggle to parse through all the writing on this github then fear not, for i have found the information you require!
that's it! that's all you need to add mspaint to your site. put it anywhere yipee! edit it to fit your needs, of course. for example, i have the iframe showing after clicking a link, so my code looks like this...
i hope this helps!
redirecting URL's
this tutorial is relatively simple, and im mostly wanting to document it for future use by me haha because i always forget...
in the head section of your html, you want to put one piece of code to redirect elsewhere, for whatever reason. i use this mostly to redirect my neocities automatically to my nekoweb !! tbh, i don't know how to make the redirect happen after a few seconds or something, this code executes ASAP.
copy and paste this code exactly and place it right above your closing head tag !! all you really gotta do is replace the "URLHERE" text with... well, your url, and you're done!